Collection: Sign Letter Track


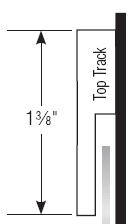
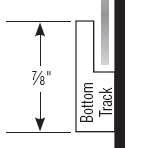
 Accurate spacing is the key to a good Pronto changeable letter system. Refer to the diagram shown here to select the method of track installation you prefer and determine the total height of your sign.
To ensure smooth installation, view our comprehensive installation instructions here.
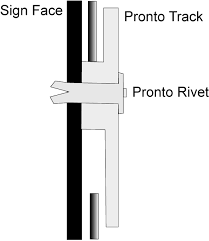
For a nylon rivet installation: drill a hole through the track and background (maximum 8" center to center). To fasten track to 1/8" - 3/16" background, drill .1875 diameter hole (3/16" drill bit). Insert the nylon Pronto rivet, then push the pin to its closed position as shown.
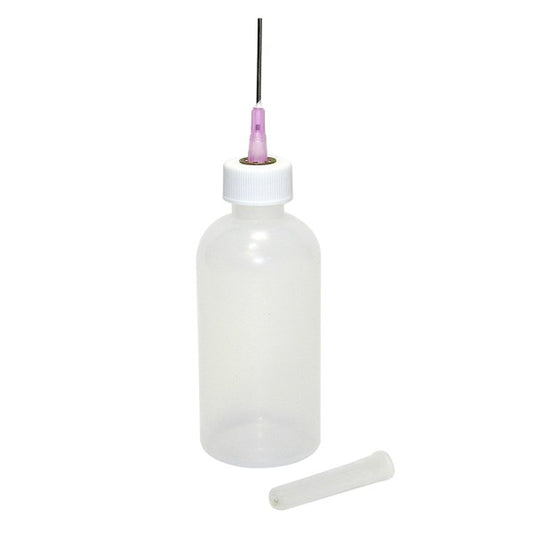
For an adhesive installation: Using a syringe or bottle applicator with a thin needle tip, apply a steady line of adhesive,
such as WELD-ON #3 or #4, to the back face of the track. Tape in place until adhesive has set up completely.
If the surface you are attaching Pronto Track onto will not expand or contract (ie. wood or metal) at the same rate as the plastic track, we recommend the following installation procedure:
• Drill or route horizontal oblong or oversized holes in the track.
• Using a sheet metal screw, because of its squared shoulder; put the screw in the center of the horizontal hole.
• Do not tighten the screw. Leave it approximately 1/4 to 1/2 turn loose.
• When all the screws are in the track you should be able to wiggle horizontally a small distance.
• Now the track is able to expand or contract with temperature changes, and shouldn’t buckle or warp.
-
Top Sign Track for Changeable Sign Letters | 6', 8', and 10' length
Regular price From $16.19 CADRegular priceTop Sign Track for Changeable Sign Letters | 6', 8', and 10' length
Regular price From $16.19 CADRegular priceTop Sign Track for Changeable Sign Letters | 6', 8', and 10' length
Regular price From $16.19 CADRegular price -
Middle | Dual Sign Track for Changeable Sign Letters | 6', 8', and 10' length
Regular price From $16.65 CADRegular priceMiddle | Dual Sign Track for Changeable Sign Letters | 6', 8', and 10' length
Regular price From $16.65 CADRegular priceMiddle | Dual Sign Track for Changeable Sign Letters | 6', 8', and 10' length
Regular price From $16.65 CADRegular price -
Bottom Sign Track for Changeable Sign Letters | 6', 8', and 10' length
Regular price From $13.48 CADRegular priceBottom Sign Track for Changeable Sign Letters | 6', 8', and 10' length
Regular price From $13.48 CADRegular priceBottom Sign Track for Changeable Sign Letters | 6', 8', and 10' length
Regular price From $13.48 CADRegular price -
100 Pack Letter Track Rivets - Durable Nylon Fasteners for Sign Installation
Regular price From $52.93 CADRegular price100 Pack Letter Track Rivets - Durable Nylon Fasteners for Sign Installation
Regular price From $52.93 CADRegular price100 Pack Letter Track Rivets - Durable Nylon Fasteners for Sign Installation
Regular price From $52.93 CADRegular price -
Hypo 49 Solvent Applicator Bottle w/Needle
Regular price $14.20 CADRegular price